Kotlin Coroutine基础
什么是Coroutine?
Coroutines = Co + Routines
Co意味着cooperation而Routines意味着functions
也就是说协程就是可以让function不断的交互来实现功能
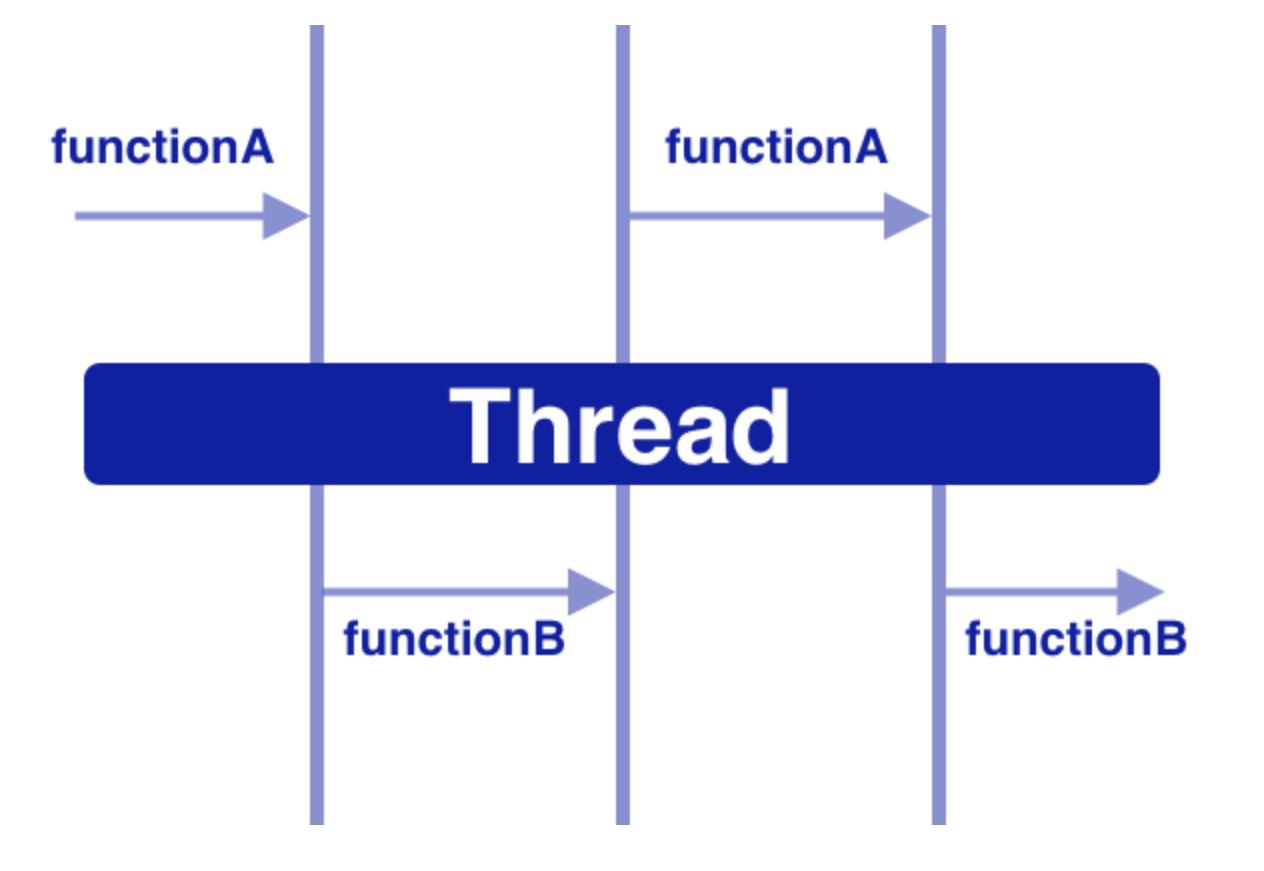
比如说下面这段代码
fun functionA(case: Int) {
    when (case) {
        1 -> {
            taskA1()
            functionB(1)
        }
        2 -> {
            taskA2()
            functionB(2)
        }
        3 -> {
            taskA3()
            functionB(3)
        }
        4 -> {
            taskA4()
            functionB(4)
        }
    }
}

fun functionB(case: Int) {
    when (case) {
        1 -> {
            taskB1()
            functionA(2)
        }
        2 -> {
            taskB2()
            functionA(3)
        }
        3 -> {
            taskB3()
            functionA(4)
        }
        4 -> {
            taskB4()
        }
    }
}

functionA(1)
在这串代码中,functionA会执行taskA1然后把执行权交给functionB执行taskB1,然后functionB会执行taskB1然后又把执行权交还给functionA,就这样交替最后俩个函数都完成了任务,而通过协程,我们要实现上面的功能就不用这么复杂的使用when或者switch case,协程会帮助我们让函数彼此合作完成任务,协程可能会执行A的一部分代码然后又执行B的一部分代码,这样可以让线程的空闲时间最小化,提高线程的利用率
协程让多任务的实现很简单,并且协程和线程不同,线程是由OS管理的并且切换起来十分复杂,但是协程是由程序员操控的并且是基于线程设计的,是一套管理线程的框架,可以说它是更轻量的线程,更轻量的线程意味着协程不是直接映射到某个线程上的,可能会出现某个suspend方法在一个线程执行时挂起然后又在另一个线程resume
为什么需要协程?
协程可以帮助我们用同步的方式写出异步的代码并且协程相比于线程十分轻量级(线程的切换十分的重量级而协程则不)
以前我们写异步代码可能会这样写
//Callback
fun fetchAndShowUser() {
    fetchUser { user ->
        showUser(user)
    }
}

//RxJava
fetchUser()
        .subscribeOn(Schedulers.io())
        .observerOn(AndroidSchedulers.mainThread())
        .subscribe (
            {user ->showUser(user)},
            {error ->              }
        }).let {
            getCompositeDisposable().add((it))
        }
而现在我们使用协程只需要这样写
suspend fun fetchAndShowUser() {
     val user = fetchUser() // fetch on IO thread
     showUser(user) // back on UI thread
}

suspend fun fetchUser(): User {
    return GlobalScope.async(Dispatchers.IO) {
        // make network call
        // return user
    }.await()
}
下面介绍一些协程的术语
Dispatchers
IO, Default, and Main三种
IO适合于网络和磁盘任务
Default适用于CPU密集计算工作
Main则是Android主线程
suspend
用来修饰一个函数,用suspend修饰的函数可以被开启,挂起,恢复三种状态,suspend函数只能被另一个suspend函数调用或者是在协程中调用
开启协程
开启一个协程有几种方式
launch{}async{}withContext{}
launch和async的区别:
launch没有返回值,async可以通过await方法返回一个Defered实例
suspend fun fetchUserAndSaveInDatabase() {
    // fetch user from network
    // save user in database
    // and do not return anything
}

GlobalScope.launch(Dispatchers.Main) {
    fetchUserAndSaveInDatabase() // do on IO thread
}

如果fetchUserAndSaveInDatabase没有返回值我们使用launch
suspend fun fetchFirstUser(): User {
    // make network call
    // return user
}

suspend fun fetchSecondUser(): User {
    // make network call
    // return user
}

GlobalScope.launch(Dispatchers.Main) {
    val userOne = async(Dispatchers.IO) { fetchFirstUser() }
    val userTwo = async(Dispatchers.IO) { fetchSecondUser() }
    showUsers(userOne.await(), userTwo.await()) // back on UI thread
}

如果我们需要返回值,我们使用async,并且async可能让这俩个网络请求并行执行
WithContext是另一种形式的async但是不用写awati就能获得返回值
suspend fun fetchUser(): User {
    return withContext(Dispatchers.IO) {
        // make network call
        // return user
    }
}
那WithContext和async有什么区别?
GlobalScope.launch(Dispatchers.Main) {
    val userOne = async(Dispatchers.IO) { fetchFirstUser() }
    val userTwo = async(Dispatchers.IO) { fetchSecondUser() }
    showUsers(userOne.await(), userTwo.await()) // back on UI thread
}

GlobalScope.launch(Dispatchers.Main) {
    val userOne = withContext(Dispatchers.IO) { fetchFirstUser() }
    val userTwo = withContext(Dispatchers.IO) { fetchSecondUser() }
    showUsers(userOne, userTwo) // back on UI thread
}
以这段代码为例,当我们用withContext时,它会串行执行网络请求而不是向async那样并行执行
怎么选择开启协程的方式?
1.不需要并行执行就用withContext,需要就用async
2.使用withContext返回单个任务的结果,使用async返回多个并行执行的任务的结果
3.不需要返回值使用launch
此外还有一种极少使用的开启协程的方式runBlocking
fun main() = runBlocking { // this: CoroutineScope
    launch { // launch a new coroutine and continue
        delay(1000L) // non-blocking delay for 1 second (default time unit is ms)
        println("World!") // print after delay
    }
    println("Hello") // main coroutine continues while a previous one is delayed
}

Hello
World!
使用runBlocking开启的协程会阻塞住当前线程直到runBlocking开启的协程里面所有的子协程都执行完毕
取消协程
cancel取消
某些情况我们可能需要在协程还没有执行完的时候手动取消它,比如在一个activity中网路请求还没有完成但是用户退出activity了
launch会返回一个job,这个job可以拿来取消正在运行的协程
val job = launch {
    repeat(1000) { i ->
        println("job: I'm sleeping $i ...")
        delay(500L)
    }
}
delay(1300L) // delay a bit
println("main: I'm tired of waiting!")
job.cancel() // cancels the job
job.join() // waits for job's completion
println("main: Now I can quit.")
job: I'm sleeping 0 ...
job: I'm sleeping 1 ...
job: I'm sleeping 2 ...
main: I'm tired of waiting!
main: Now I can quit.
当协程中执行suspend得方法时,此时会检查协程是否已经取消,如果取消了就会结束协程并且抛出CancellationException,但是如果协程中没有suspend方法的话,此时就没有检查协程是否取消得point,就无法被取消
val startTime = System.currentTimeMillis()
val job = launch(Dispatchers.Default) {
    var nextPrintTime = startTime
    var i = 0
    while (i < 5) { // computation loop, just wastes CPU
        // print a message twice a second
        if (System.currentTimeMillis() >= nextPrintTime) {
            println("job: I'm sleeping ${i++} ...")
            nextPrintTime += 500L
        }
    }
}
delay(1300L) // delay a bit
println("main: I'm tired of waiting!")
job.cancelAndJoin() // cancels the job and waits for its completion
println("main: Now I can quit.")
job: I'm sleeping 0 ...
job: I'm sleeping 1 ...
job: I'm sleeping 2 ...
main: I'm tired of waiting!
job: I'm sleeping 3 ...
job: I'm sleeping 4 ...
main: Now I can quit.
通过对有取消监测点得代码trycatch也能观察到相同的现象
val job = launch(Dispatchers.Default) {
    repeat(5) { i ->
        try {
            // print a message twice a second
            println("job: I'm sleeping $i ...")
            delay(500)
        } catch (e: Exception) {
            // log the exception
            println(e)
        }
    }
}
delay(1300L) // delay a bit
println("main: I'm tired of waiting!")
job.cancel() // cancels the job
job.join() // waits for job's completion
println("main: Now I can quit.")
job: I'm sleeping 0 ...
job: I'm sleeping 1 ...
job: I'm sleeping 2 ...
main: I'm tired of waiting!
kotlinx.coroutines.JobCancellationException: StandaloneCoroutine was cancelled; job="coroutine#2":StandaloneCoroutine{Cancelling}@77372d96
job: I'm sleeping 3 ...
kotlinx.coroutines.JobCancellationException: StandaloneCoroutine was cancelled; job="coroutine#2":StandaloneCoroutine{Cancelling}@77372d96
job: I'm sleeping 4 ...
kotlinx.coroutines.JobCancellationException: StandaloneCoroutine was cancelled; job="coroutine#2":StandaloneCoroutine{Cancelling}@77372d96
main: Now I can quit.
有俩种方法可以解决:
1.使用suspend方法
比如说yield方法
2.显式检测协程状态
val startTime = System.currentTimeMillis()
val job = launch(Dispatchers.Default) {
    var nextPrintTime = startTime
    var i = 0
    while (isActive) { // cancellable computation loop
        // print a message twice a second
        if (System.currentTimeMillis() >= nextPrintTime) {
            println("job: I'm sleeping ${i++} ...")
            nextPrintTime += 500L
        }
    }
}
delay(1300L) // delay a bit
println("main: I'm tired of waiting!")
job.cancelAndJoin() // cancels the job and waits for its completion
println("main: Now I can quit.")
job: I'm sleeping 0 ...
job: I'm sleeping 1 ...
job: I'm sleeping 2 ...
main: I'm tired of waiting!
main: Now I can quit.
如果在协程中使用try finally需要执行耗时任务:
val job = launch {
    try {
        repeat(1000) { i ->
            println("job: I'm sleeping $i ...")
            delay(500L)
        }
    } finally {
        withContext(NonCancellable) {
            println("job: I'm running finally")
            delay(1000L)
            println("job: And I've just delayed for 1 sec because I'm non-cancellable")
        }
    }
}
delay(1300L) // delay a bit
println("main: I'm tired of waiting!")
job.cancelAndJoin() // cancels the job and waits for its completion
println("main: Now I can quit.")
job: I'm sleeping 0 ...
job: I'm sleeping 1 ...
job: I'm sleeping 2 ...
main: I'm tired of waiting!
job: I'm running finally
job: And I've just delayed for 1 sec because I'm non-cancellable
main: Now I can quit.
超时取消
使用withTimeout API
withTimeout(1300L) {
    repeat(1000) { i ->
        println("I'm sleeping $i ...")
        delay(500L)
    }
}
I'm sleeping 0 ...
I'm sleeping 1 ...
I'm sleeping 2 ...
Exception in thread "main" kotlinx.coroutines.TimeoutCancellationException: Timed out waiting for 1300 ms
TimeoutCancellationException是CancellationException的子类
使用withTimeoutOrNull API不会抛出异常而是返回null
val result = withTimeoutOrNull(1300L) {
    repeat(1000) { i ->
        println("I'm sleeping $i ...")
        delay(500L)
    }
    "Done" // will get cancelled before it produces this result
}
println("Result is $result")
I'm sleeping 0 ...
I'm sleeping 1 ...
I'm sleeping 2 ...
Result is null
注意:
withTimeout可能会在任何时刻取消,比如最后一个语句获得了某个资源正准备返回时就取消了
比如下面这个例子,acquired表示resource被获取的次数,close会让acquired减一
运行会发现结果并不一定是0
var acquired = 0

class Resource {
    init { acquired++ } // Acquire the resource
    fun close() { acquired-- } // Release the resource
}

fun main() {
    runBlocking {
        repeat(100_000) { // Launch 100K coroutines
            launch {
                val resource = withTimeout(60) { // Timeout of 60 ms
                    delay(50) // Delay for 50 ms
                    Resource() // Acquire a resource and return it from withTimeout block
                }
                resource.close() // Release the resource
            }
        }
    }
    // Outside of runBlocking all coroutines have completed
    println(acquired) // Print the number of resources still acquired
}
要解决这个问题,可以使用finally语句
runBlocking {
    repeat(100_000) { // Launch 100K coroutines
        launch {
            var resource: Resource? = null // Not acquired yet
            try {
                withTimeout(60) { // Timeout of 60 ms
                    delay(50) // Delay for 50 ms
                    resource = Resource() // Store a resource to the variable if acquired
                }
                // We can do something else with the resource here
            } finally {
                resource?.close() // Release the resource if it was acquired
            }
        }
    }
}
// Outside of runBlocking all coroutines have completed
println(acquired) // Print the number of resources still acquired
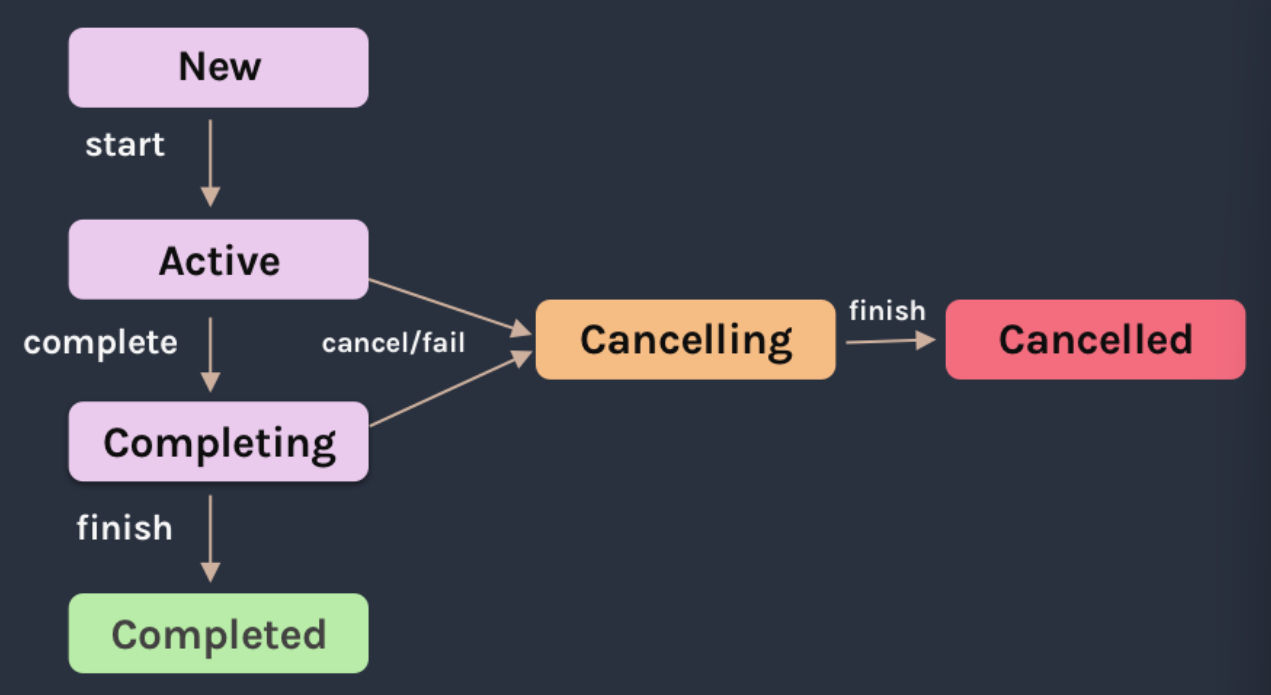
协程的生命周期
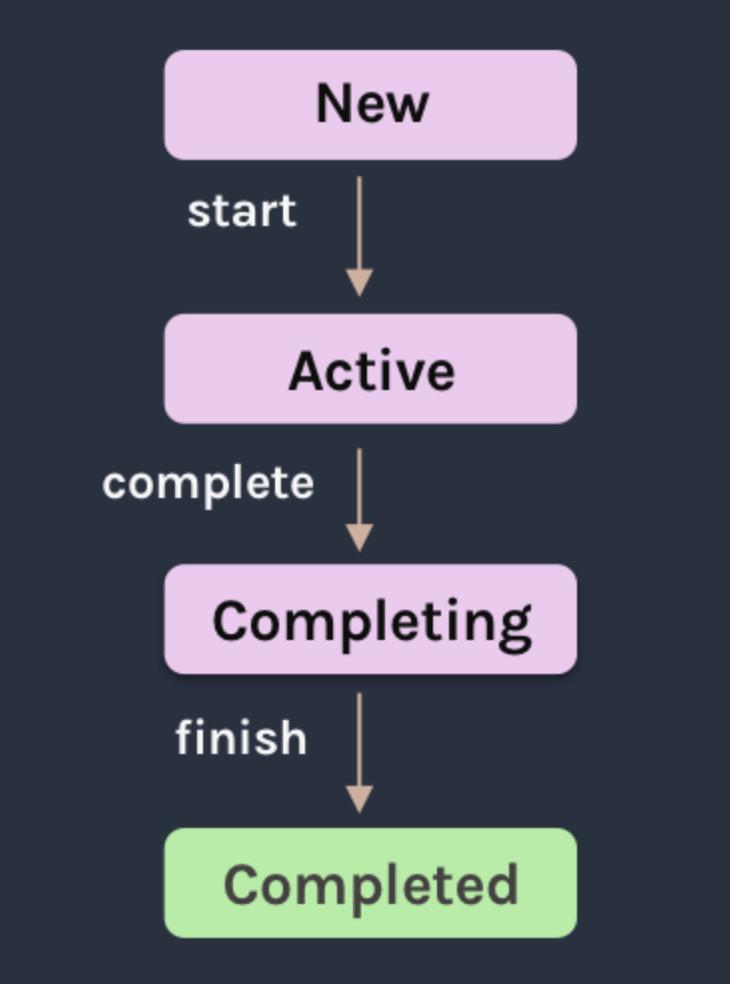
一般来说,协程会从active state开始,当所有子协程都执行完成前,父协程会处于completing状态,只有当协程里所有子协程都执行完,父协程才会处于completed状态
我们可以用这仨个标志来判断协程的状态:
isActive— true if in the active and completing statesisCompleted— defaultfalse. changes totrueonce all the parent and child jobs are completed.isCancelled— defaultfalse. If any exception occurs or you cancel the coroutine, the value changes totrue.
只能在协程进入active或completing状态后取消它。发生这种情况时,协程将进入取消状态,一旦所有job被取消,它将进入canceled状态
协程作用域
协程作用域可以帮助我们管理协程资源的释放,比如说一个网络请求任务不需要继续执行了(比如说Activty推出了)我们要终止这个协程的执行
class MainActivity : AppCompatActivity(), CoroutineScope {

    override val coroutineContext: CoroutineContext
        get() = Dispatchers.Main + job

    private lateinit var job: Job

    override fun onCreate(savedInstanceState: Bundle?) {
    super.onCreate(savedInstanceState)
    job = Job() // create the Job
}

override fun onDestroy() {
    job.cancel() // cancel the Job
    super.onDestroy()
}

}

launch {
    val userOne = async(Dispatchers.IO) { fetchFirstUser() }
    val userTwo = async(Dispatchers.IO) { fetchSecondUser() }
    showUsers(userOne.await(), userTwo.await())
}
通过这种方式,activity销毁时,任务就会终止
除了activity的scope还有整个application的scope GlobalScope
GlobalScope.launch(Dispatchers.Main) {
    val userOne = async(Dispatchers.IO) { fetchFirstUser() }
    val userTwo = async(Dispatchers.IO) { fetchSecondUser() }
}
通过GlobalScope发起的协程即使activity摧毁了也不会终止任务
同时,如果取消了CoroutineScope中一个子协程,它的所有子协程都会停止执行,CoroutineScope也会停止执行
为了防止这种情况,我们可以使用SupervisorJob来创建一个CoroutineScope
val viewModelJob = SupervisorJob()
val viewmodelCoroutineScope = CoroutineScope(Dispatchers.IO + viewModelJob)
协程上下文Context
协程Context是由一系列元素组成的,主要包括job,Dispatcher,handler,协程的名字组成,我们主要介绍job和Dispatcher
我们可以把这些元素组合起来形成一个协程上下文Context
比如
launch(Dispatchers.Default + CoroutineName("test")) {
    println("I'm working in thread ${Thread.currentThread().name}")
}
Dispatcher
协程Dispatcher可以决定协程在什么样的线程上执行
Dispatchers.Default 如果没有显式指明Dispatchers就是使用Dispatchers.Default,此时协程会运行在线程池上
Dispatchers.IO 适合执行IO任务时使用
Dispatchers.Main 仅在Android平台上存在,指代主线程,用来更新UI
newSingleThreadContext 会创建一个新的线程让协程运行在上面,线程是很珍贵的资源,在实际开发中当我们不需要时一定要记得调用close方法或者是把它储存起来并且复用
Job
job可以通过coroutineContext[Job]获得,也可以通过开启协程时的返回值得到
job通常是用来取消协程,当从协程中开启另外一个协程时,默认它们之间存在父子关系,即子协程会继承父协程的Context并且父协程的job会是子协程job的父亲,当父协程调用job的cancel时子协程也会被取消
当然,默认是这样的,但我们可以显式改变:
1.当开启一个新协程时执行了新的协程作用域,比如GlobalScope.launch
2.开启新协程时显式指明新的Job
val request = launch {
    // it spawns two other jobs
    launch(Job()) {
        println("job1: I run in my own Job and execute independently!")
        delay(1000)
        println("job1: I am not affected by cancellation of the request")
    }
    // and the other inherits the parent context
    launch {
        delay(100)
        println("job2: I am a child of the request coroutine")
        delay(1000)
        println("job2: I will not execute this line if my parent request is cancelled")
    }
}
delay(500)
request.cancel() // cancel processing of the request
println("main: Who has survived request cancellation?")
delay(1000) // delay the main thread for a second to see what happens
job1: I run in my own Job and execute independently!
job2: I am a child of the request coroutine
main: Who has survived request cancellation?
job1: I am not affected by cancellation of the request
异常处理
launch发起的协程的异常处理
1.使用 try catch
GlobalScope.launch(Dispatchers.Main) {
    try {
        fetchUserAndSaveInDatabase() // do on IO thread and back to UI Thread
    } catch (exception: Exception) {
        Log.d(TAG, "$exception handled !")
    }
}
2.使用handler
val handler = CoroutineExceptionHandler { _, exception ->
    Log.d(TAG, "$exception handled !")
}

GlobalScope.launch(Dispatchers.Main + handler) {
    fetchUserAndSaveInDatabase() // do on IO thread and back to UI Thread
}
或者这样
class MainActivity : AppCompatActivity(), CoroutineScope {

    override val coroutineContext: CoroutineContext
        get() = Dispatchers.Main + job + handler

    private lateinit var job: Job

}

launch {
    fetchUserAndSaveInDatabase()
}
async发起的协程的异常处理
使用try catch
val deferredUser = GlobalScope.async {
    fetchUser()
}
try {
    val user = deferredUser.await()
} catch (exception: Exception) {
    Log.d(TAG, "$exception handled !")
}
多个任务执行时的异常处理
串行请求
launch {
    try {
        val users = getUsers()
        val moreUsers = getMoreUsers()
    } catch (exception: Exception) {
        Log.d(TAG, "$exception handled !")
    }
}
在上面这几行代码中,如果其中一个网络请求失败了就会直接进入到catch代码块中,但是如果我们想要其中一个的请求失败不影响另外一个呢?
可以这样做
launch {
    try {
        val users = try {
            getUsers()
        } catch (e: Exception) {
            emptyList<User>()
        }
        val moreUsers = try {
            getMoreUsers()
        } catch (e: Exception) {
            emptyList<User>()
        }
    } catch (exception: Exception) {
        Log.d(TAG, "$exception handled !")
    }
}
这样即使其中一个请求失败了也只会返回一个空列表
并行请求
如果我们希望多个请求之间是并行的,可以这样写
launch {
    try {
        val usersDeferred = async {  getUsers() }
        val moreUsersDeferred = async { getMoreUsers() }
        val users = usersDeferred.await()
        val moreUsers = moreUsersDeferred.await()
    } catch (exception: Exception) {
        Log.d(TAG, "$exception handled !")
    }
}
但是这样也有问题,就是如果其中一个失败了,app会直接crash而不是进入catch块中
launch {
    try {
        coroutineScope {
            val usersDeferred = async {  getUsers() }
            val moreUsersDeferred = async { getMoreUsers() }
            val users = usersDeferred.await()
            val moreUsers = moreUsersDeferred.await()
        }
    } catch (exception: Exception) {
        Log.d(TAG, "$exception handled !")
    }
}
我们得这样写
但是如果我们希望其中一个得结果不会影响到另外一个呢?
可以使用supervisorScope来解决问题
launch {
    try {
        supervisorScope {
            val usersDeferred = async { getUsers() }
            val moreUsersDeferred = async { getMoreUsers() }
            val users = try {
                usersDeferred.await()
            } catch (e: Exception) {
                emptyList<User>()
            }
            val moreUsers = try {
                moreUsersDeferred.await()
            } catch (e: Exception) {
                emptyList<User>()
            }
        }
    } catch (exception: Exception) {
        Log.d(TAG, "$exception handled !")
    }
}
结论:
1.如果不是使用async,我们可以用try catch 或者 CoroutineExceptionHandler
2.如果使用async,我们需要使用coroutineScope和supervisorScope来防止异常没有处理直接app Crash
3.supervisorScope可以给单个请求try catch来让多个请求结果之间不影响
4.coroutineScope使用得是最高等级得try catch,当我们不需要多个任务执行失败不会互相影响时就这样用
The major difference is that a coroutineScope will cancel whenever any of its children fail. If we want to continue with the other tasks even when one fails, we go with the supervisorScope. A supervisorScope won’t cancel other children when one of them fails.
runCatching
除了try-catch外,kotlin还提供了runCatching,它会返回一个对象,通过这个对象我们可以知道请求是否成功,如果不成功我们还可以通过这个对象拿到错误得具体信息
viewmodelCoroutineScope.launch {
    val result = kotlin.runCatching {
        repository.getData(inputs)
    }
}
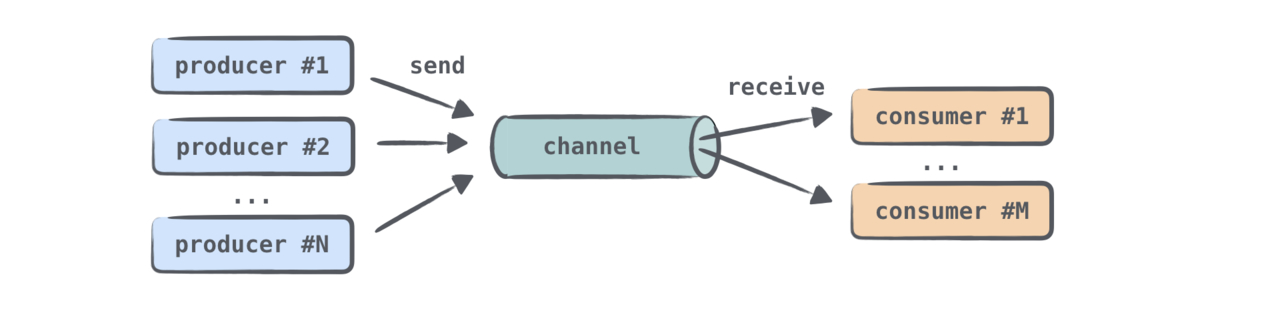
Channels
基础
Channel从和BlockQueue很相似,它们俩个最大的不同就是Channel的send方法替代了BlockQueue的put,而put方法可能阻塞线程,send方法则是挂起函数,同理receive和take方法
Channel通常用来协程之间的通信,就像BlockingQueue被用来进行线程之间的通信一样
Channel继承俩个接口SendChannel和ReceiveChannel,SendChannel代表发送消息的Channel,ReceiveChannel代表接收消息的Channel,我们通常给消费者ReceiveChannel的实例而给生产者对象SendChannel实例,这样它们就只能往Channel中收消息或者是发消息
interface SendChannel<in E> {
    suspend fun send(element: E)
    fun close(): Boolean
}

interface ReceiveChannel<out E> {
    suspend fun receive(): E
}

interface Channel<E> : SendChannel<E>, ReceiveChann<>E
SendChannel中还定义了一个方法close,通过它可以表明Channel不会再有新元素的插入
Channel的类型
val rendezvousChannel = Channel<String>()
val bufferedChannel = Channel<String>(10)
val conflatedChannel = Channel<String>(CONFLATED)
val unlimitedChannel = Channel<String>(UNLIMITED)
Unlimited channel

消息数量没有上限,如果内存大小不够了会报OOM
Buffered channel

消息大小有上限
Rendezvous channel

没有buffer的Channel,等用于new一个buffer为0的Buffered channel
rendezvous的意思就是说send和receive需要在同一时刻
如果send被调用了但是此时没有挂起的receive函数,send挂起
同理receive调用了但是此时没有挂起的send函数,receive挂起
有一种特殊的Rendezvous channel —— Ticker channels
它会从上一次从这个Channel中消费数据开始计时等待delayMillis的时间后发送一个UNIT,并且不会停息,我们可以利用这个特性实现ticker功能
fun main() = runBlocking<Unit> {
    val tickerChannel = ticker(delayMillis = 100, initialDelayMillis = 0) // create ticker channel
    var nextElement = withTimeoutOrNull(1) { tickerChannel.receive() }
    println("Initial element is available immediately: $nextElement") // no initial delay

    nextElement = withTimeoutOrNull(50) { tickerChannel.receive() } // all subsequent elements have 100ms delay
    println("Next element is not ready in 50 ms: $nextElement")

    nextElement = withTimeoutOrNull(60) { tickerChannel.receive() }
    println("Next element is ready in 100 ms: $nextElement")

    // Emulate large consumption delays
    println("Consumer pauses for 150ms")
    delay(150)
    // Next element is available immediately
    nextElement = withTimeoutOrNull(1) { tickerChannel.receive() }
    println("Next element is available immediately after large consumer delay: $nextElement")
    // Note that the pause between `receive` calls is taken into account and next element arrives faster
    nextElement = withTimeoutOrNull(60) { tickerChannel.receive() }
    println("Next element is ready in 50ms after consumer pause in 150ms: $nextElement")

    tickerChannel.cancel() // indicate that no more elements are needed
}
Initial element is available immediately: kotlin.Unit
Next element is not ready in 50 ms: null
Next element is ready in 100 ms: kotlin.Unit
Consumer pauses for 150ms
Next element is available immediately after large consumer delay: kotlin.Unit
Next element is ready in 50ms after consumer pause in 150ms: kotlin.Unit
Conflated channel
发送给Conflated channel的新元素会覆写掉旧元素
因此send永远不会被挂起
http://pic.zhongtai521.wang/20220610180810.gif
实战1
tips 我们可以在viewmodel使用viewmodelscope 它会在viewmodel的onclear方法里自动释放资源
class MainViewModel : ViewModel() {
    // Make a network request without blocking the UI thread
    private fun makeNetworkRequest() {
        // launch a coroutine in viewModelScope
        viewModelScope.launch  {
            remoteApi.slowFetch()
            ...
        }
    }

    // No need to override onCleared()
}
repository
interface Repository : LifecycleObserver {
  fun getPhotos(): LiveData<List<String>>
  fun getBanner(): LiveData<String>
  fun registerLifecycle(lifecycle: Lifecycle)
}

class PhotosRepository : Repository, CoroutineScope {

  private val bannerLiveData = MutableLiveData<String>()
  private val job: Job = Job()
  override val coroutineContext: CoroutineContext
    get() = Dispatchers.Main + job

  override fun getBanner(): LiveData<String> {
    launch {
      fetchBanner()
    }
    return bannerLiveData
  }

  private suspend fun fetchBanner() {
    val banner = withContext(Dispatchers.IO) {
      val photosString = PhotosUtils.photoJsonString()
      PhotosUtils.bannerFromJsonString(photosString ?: "")
    }

    if (banner != null) {
      bannerLiveData.value = banner
    }
  }

  override fun registerLifecycle(lifecycle: Lifecycle) {
    lifecycle.addObserver(this)
  }

  @OnLifecycleEvent(Lifecycle.Event.ON_STOP)
  private fun cancelJob() {
    if (job.isActive) {
      job.cancel()
    }
  }
}
ViewModel
class PhotosViewModel(private val repository: Repository) : ViewModel() {

  fun getPhotos(): LiveData<List<String>> {
    return repository.getPhotos()
  }

  fun getBanner(): LiveData<String> {
    return repository.getBanner()
  }
}
获取Viewmodel
class PhotosViewModelFactory(private val repository: Repository) : ViewModelProvider.Factory {

  @Suppress("UNCHECKED_CAST")
  override fun <T : ViewModel> create(modelClass: Class<T>): T {
    if (modelClass.isAssignableFrom(PhotosViewModel::class.java)) {
      return PhotosViewModel(repository) as T
    }
    throw IllegalArgumentException("Unknown ViewModel class")
  }
}

object Injection {

  private fun provideRepository(): Repository {
    return PhotosRepository()
  }

  fun provideViewModelFactory(lifecycle: Lifecycle): PhotosViewModelFactory {
    val repository = provideRepository()
    repository.registerLifecycle(lifecycle)
    return PhotosViewModelFactory(repository)
  }
}
View
class PhotosFragment : Fragment() {

  private lateinit var viewModel: PhotosViewModel

  override fun onCreateView(inflater: LayoutInflater, container: ViewGroup?, savedInstanceState: Bundle?): View {

    return inflater.inflate(R.layout.fragment_photos, container, false)
  }

  override fun onAttach(context: Context?) {
    super.onAttach(context)

    val viewModelFactory = Injection.provideViewModelFactory(lifecycle)
    viewModel = ViewModelProviders.of(this, viewModelFactory).get(PhotosViewModel::class.java)
  }

  override fun onViewCreated(view: View, savedInstanceState: Bundle?) {
    super.onViewCreated(view, savedInstanceState)

    viewModel.getBanner().observe(this, Observer { banner ->
      Picasso.get().load(banner).fit().into(bannerImageView)
    })
  }
}
实战2
API:
interface GitHubService {
    @GET("orgs/{org}/repos?per_page=100")
    fun getOrgReposCall(
        @Path("org") org: String
    ): Call<List<Repo>>

    @GET("repos/{owner}/{repo}/contributors?per_page=100")
    fun getRepoContributorsCall(
        @Path("owner") owner: String,
        @Path("repo") repo: String
    ): Call<List<User>>
}
主要用来获取一个列表的repo,然后每个repo再请求到所有的contributors最后再展示出来所有repo的contributor的total contribution
阻塞主线程
先来看看会阻塞主线程的版本
fun loadContributorsBlocking(service: GitHubService, req: RequestData) : List<User> {
    val repos = service
        .getOrgReposCall(req.org)
        .execute()
        .also { logRepos(req, it) }
        .bodyList()

    return repos.flatMap { repo ->
        service
            .getRepoContributorsCall(req.org, repo.name)
            .execute()
            .also { logUsers(repo, it) }
            .bodyList()
    }.aggregate()
}

fun <T> Response<List<T>>.bodyList(): List<T> {
    return body() ?: listOf()
}

//这个函数的作用是为了合并当一个contributor contribute了多个repo的情况
fun List<User>.aggregate(): List<User> =
    groupBy { it.login }
        .map { (login, group) -> User(login, group.sumBy { it.contributions }) }
        .sortedByDescending { it.contributions }
子线程运行并且使用回调
thread {
    loadContributorsBlocking(service, req)
}
当这样时,任务在子线程中运行但是是串行运行的

如果我们希望获得每个repo的contriburors是并行请求的,这显然要使用回调(高阶函数)来解决
val allUsers = mutableListOf<User>()
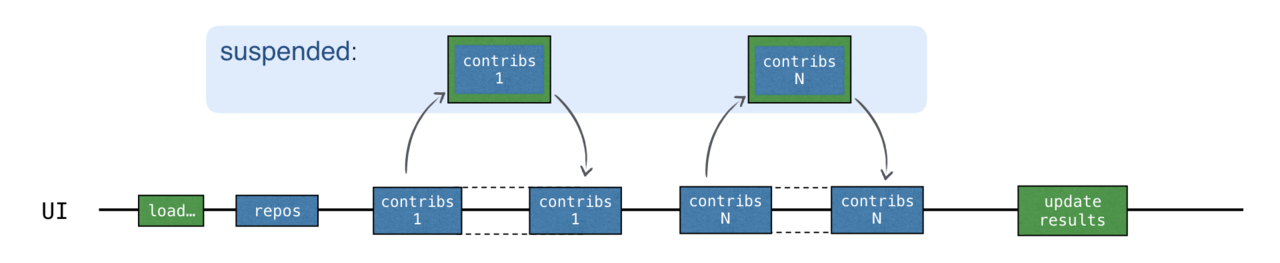
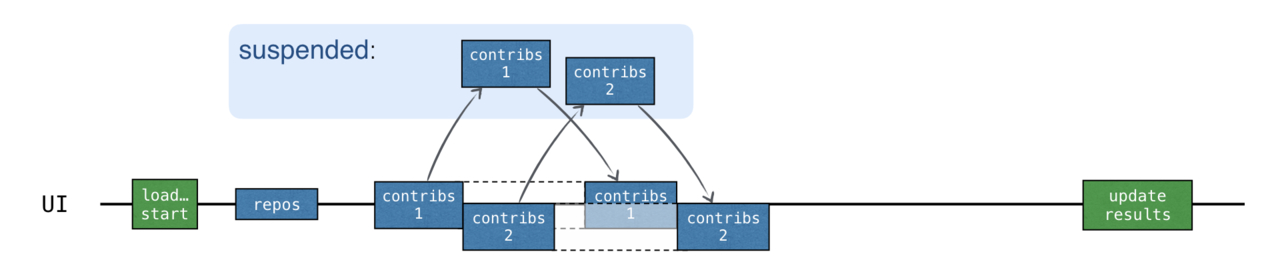
for ((index, repo) in repos.withIndex()) { // #1
service.getRepoContributorsCall(req.org, repo.name).onResponse { responseUsers ->
logUsers(repo, responseUsers)
val users = responseUsers.bodyList()
allUsers += users
if (index == repos.lastIndex) { // #2
updateResults(allUsers.aggregate())
}
}
}
此时是有问题的,因为此时请求每个repo的contributors任务是并行的,最后一个任务可能会提前执行完成
我们有俩种解决办法:
service.getOrgReposCall(req.org).onResponse { responseRepos ->
        logRepos(req, responseRepos)
        val repos = responseRepos.bodyList()
        val allUsers = Collections.synchronizedList(mutableListOf<User>())
        val numberOfProcessed = AtomicInteger()
        for (repo in repos) {
            service.getRepoContributorsCall(req.org, repo.name).onResponse { responseUsers ->
                logUsers(repo, responseUsers)
                val users = responseUsers.bodyList()
                allUsers += users
                if (numberOfProcessed.incrementAndGet() == repos.size) {
                    updateResults(allUsers.aggregate())
                }
            }
        }
    }
val countDownLatch = CountDownLatch(repos.size)
    for (repo in repos) {
        service.getRepoContributorsCall(req.org, repo.name).onResponse { responseUsers ->
            // processing repository
            countDownLatch.countDown()
        }
    }
    countDownLatch.await()
    updateResults(allUsers.aggregate())
使用suspend函数
API需要修改:
interface GitHubService {
    // getOrgReposCall & getRepoContributorsCall declarations

    @GET("orgs/{org}/repos?per_page=100")
    suspend fun getOrgRepos(
        @Path("org") org: String
    ): Response<List<Repo>>

    @GET("repos/{owner}/{repo}/contributors?per_page=100")
    suspend fun getRepoContributors(
        @Path("owner") owner: String,
        @Path("repo") repo: String
    ): Response<List<User>>
}
执行任务的函数这样改:
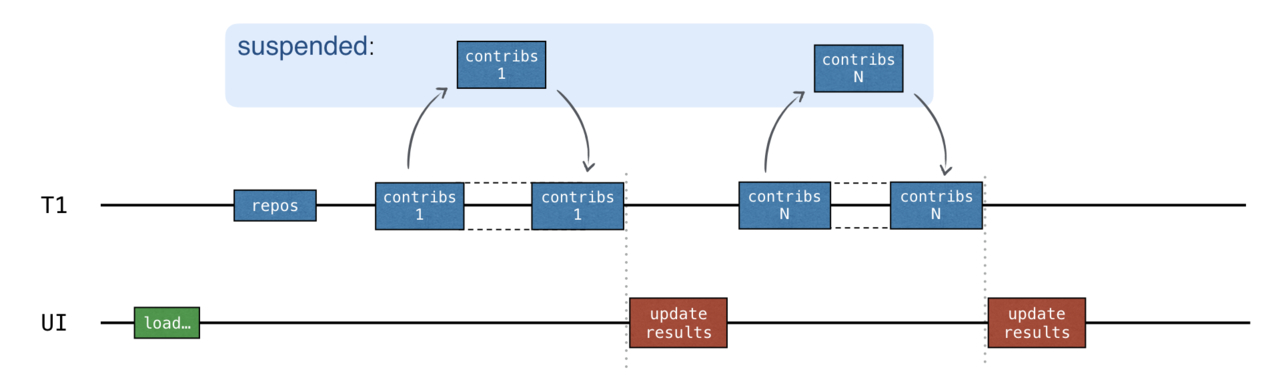
suspend fun loadContributorsSuspend(service: GitHubService, req: RequestData): List<User> {
    val repos = service
        .getOrgRepos(req.org)
        .also { logRepos(req, it) }
        .bodyList()

    return repos.flatMap { repo ->
        service.getRepoContributors(req.org, repo.name)
            .also { logUsers(repo, it) }
            .bodyList()
    }.aggregate()
}
在外围调用这个执行任务的地方需要是一个协程作用域或者也是一个挂起函数
launch {
    val users = loadContributorsSuspend(req)
    updateResults(users, startTime)
}
但是此时任务又回到了串行执行
我们希望并行执行
协程中的async API 可以开启一个新的协程并返回一个Deferred对象,只有调用了Defered对象的await方法后协程才会开启运算
suspend fun loadContributorsConcurrent(service: GitHubService, req: RequestData): List<User> = coroutineScope {
    val repos = service
        .getOrgRepos(req.org)
        .also { logRepos(req, it) }
        .bodyList()

    val deferreds: List<Deferred<List<User>>> = repos.map { repo ->
		async(Dispatchers.Default) {
    log("starting loading for ${repo.name}")
    service.getRepoContributors(req.org, repo.name)
        .also { logUsers(repo, it) }
        .bodyList()
}
    }
    deferreds.awaitAll().flatten().aggregate()
}
在调用端我们这样修改
launch(Dispatchers.Default) {
    val users = loadContributorsConcurrent(service, req)
    withContext(Dispatchers.Main) {
        updateResults(users, startTime)
    }
}
利用Channel实现阶段性展示结果
suspend fun loadContributorsProgress(
    service: GitHubService,
    req: RequestData,
    updateResults: suspend (List<User>, completed: Boolean) -> Unit
) {
    val repos = service
        .getOrgRepos(req.org)
        .also { logRepos(req, it) }
        .bodyList()

    var allUsers = emptyList<User>()
    for ((index, repo) in repos.withIndex()) {
        val users = service.getRepoContributors(req.org, repo.name)
            .also { logUsers(repo, it) }
            .bodyList()

        allUsers = (allUsers + users).aggregate()
        updateResults(allUsers, index == repos.lastIndex)
    }
}
updateResults回调会在每个请求完成后被调用
此时的请求还是串行执行的,如果我们要实现并行请求就要考虑并发安全,我们可以使用Channel来保证
Channel可以用来进行多个协程之间的信息交流,一个或多个协程可以将信息发送到Channel中,然后一个或多个协程可以从Channel中取信息,当无法发送信息(Channel已满)或无法取信息时(Channel为空)就会将函数挂起
suspend fun loadContributorsChannels(
    service: GitHubService,
    req: RequestData,
    updateResults: suspend (List<User>, completed: Boolean) -> Unit
) = coroutineScope {

    val repos = service
        .getOrgRepos(req.org)
        .also { logRepos(req, it) }
        .bodyList()

    val channel = Channel<List<User>>()
    for (repo in repos) {
        launch {
            val users = service.getRepoContributors(req.org, repo.name)
                .also { logUsers(repo, it) }
                .bodyList()
            channel.send(users)
        }
    }
    var allUsers = emptyList<User>()
    repeat(repos.size) {
        val users = channel.receive()
        allUsers = (allUsers + users).aggregate()
        updateResults(allUsers, it == repos.lastIndex)
    }
}
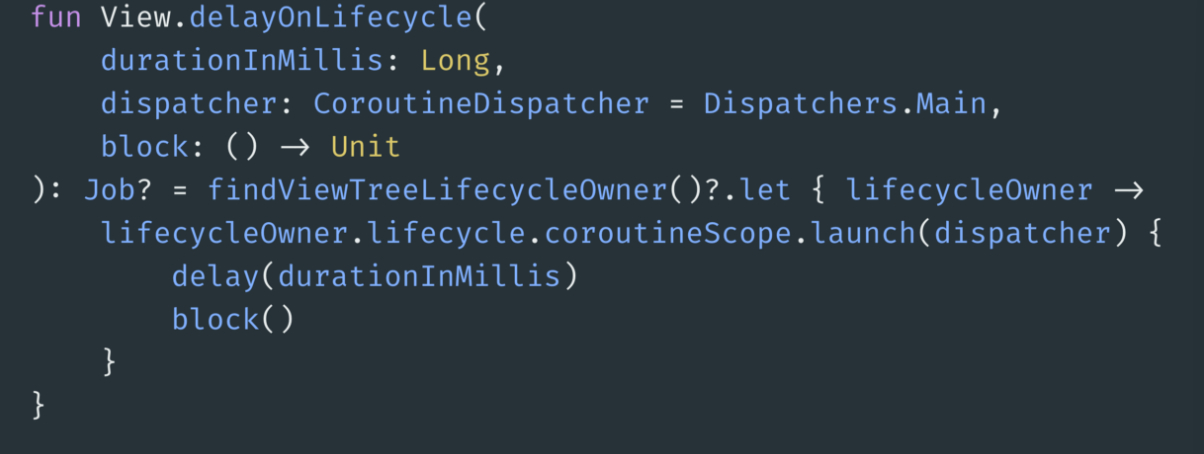
实战三 使用协程替代Handler的PostDelay
使用Handler的postDelayed存在的问题
Handler如果不提供对应的Looper,会导致任务丢失甚至是应用崩溃
如果是使用View的handler,由于没有和生命周期绑定,也有可能出现问题
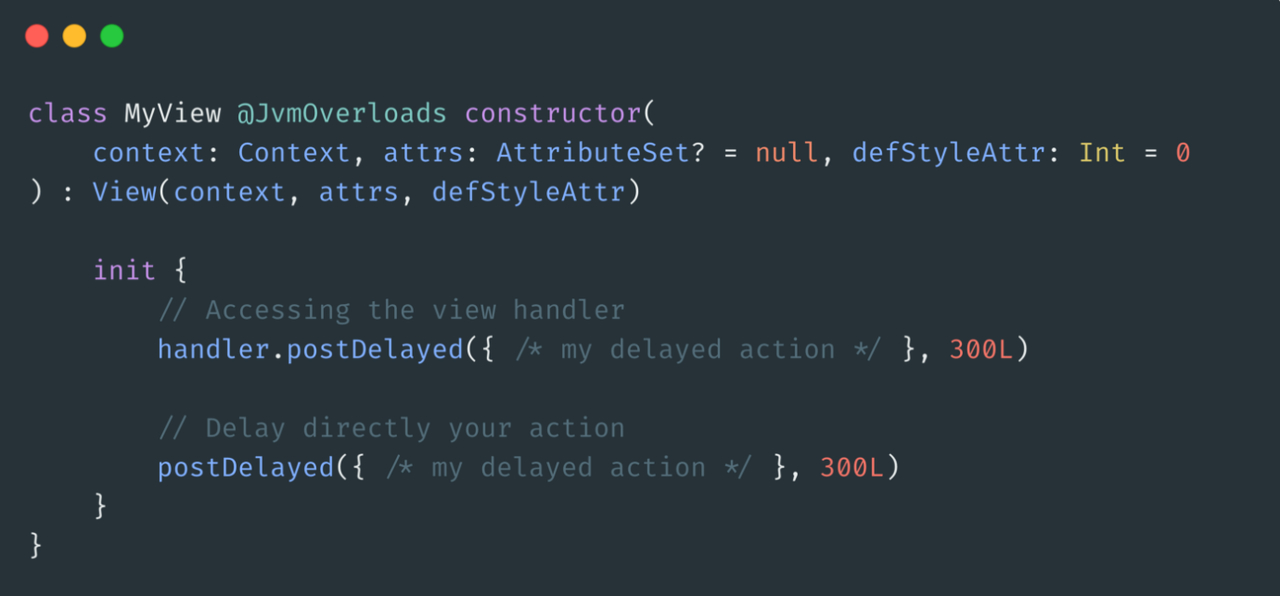
当使用View的handler发送消息时,message会被插入到线程的MessageQueue中,此时就算View被销毁了,任务还是会被执行,这可能会导致意想不到的错误
使用Kotlin + Coroutine + Lifecycle
首先需要导入依赖

接下来我们可以通过findViewTreeLifecycleOwner()获得view的lifecycleOwner,然后可以通过这个onwer的croutine scope开启新的协程
扩展知识
A deep dive into Kotlin Coroutines | by Vinicius Viana | Medium
史上最详Android版kotlin协程入门进阶实战(一) - 掘金 (juejin.cn)
标题:Kotlin Coroutine基础
作者:OkAndGreat
地址:http://zhongtai521.wang/articles/2022/06/10/1654859589794.html